Spectre Attacks Lab
Table of Contents
- Introduction
- Part 1: Leaking Kernel Memory via Flush+Reload (35%)
- Part 2: Basic Spectre (40%)
- Part 3: Advanced Spectre (25%)
Lab Details
The Spectre lab was released on March 9, and is due on March 23.
Collaboration Policy
Our full Academic Honesty policy can be found on the Course Information page of our website. As a reminder, all 6.S983 labs should be completed individually. You may discuss the lab at a high level with a classmate, but you may not work on code together or share any of your code.
Getting Started
Log into your assigned machine. Your credentials and machine have been emailed to you. It will be one of the arch-sec-[2-3].csail.mit.edu machines. To connect via ssh, run ssh YourUsername@arch-sec-X.csail.mit.edu.
We are using git for this lab – instructions for setting up the git repository can be found on the labs page. In addition to submitting code, you are required to submit a project report containing your answers to Exercises/Discussion Questions to gradescope.
Introduction
In this lab we will be putting the Spectre attack into practice against the Linux kernel. You will complete three CTF style problems of increasing difficulty to leak a secret from kernel memory using the cache as a side channel. In Part 1, we will begin by implementing a (non-speculative) Flush+Reload attack against a memory region shared with the kernel. In doing so you will get familiar with interacting with the kernel module and the general project codebase. In Part 2, you will implement a standard Spectre attack. Finally, in Part 3, you will implement a more advanced Spectre attack which requires carefully manipulating the speculative execution behavior of the victim program.
Lab Infrastructure: Interacting with Linux Kernel
In this lab we will be attacking a custom Linux kernel module. The lab infrastructure and how the userspace and kernel space interact with each other are shown in Figure 1. The kernel module resides in the kernel space, executing at a high privilege level (even greater privileges than programs run as root) and is able to read/write kernel data. The attack code resides in userspace, executing with limited privileges and being only able to read/write userspace data. The userspace code can interact with the custom kernel module using a limited interface offered by the kernel module. The interface only accepts limited and sanitized inputs from userspace.
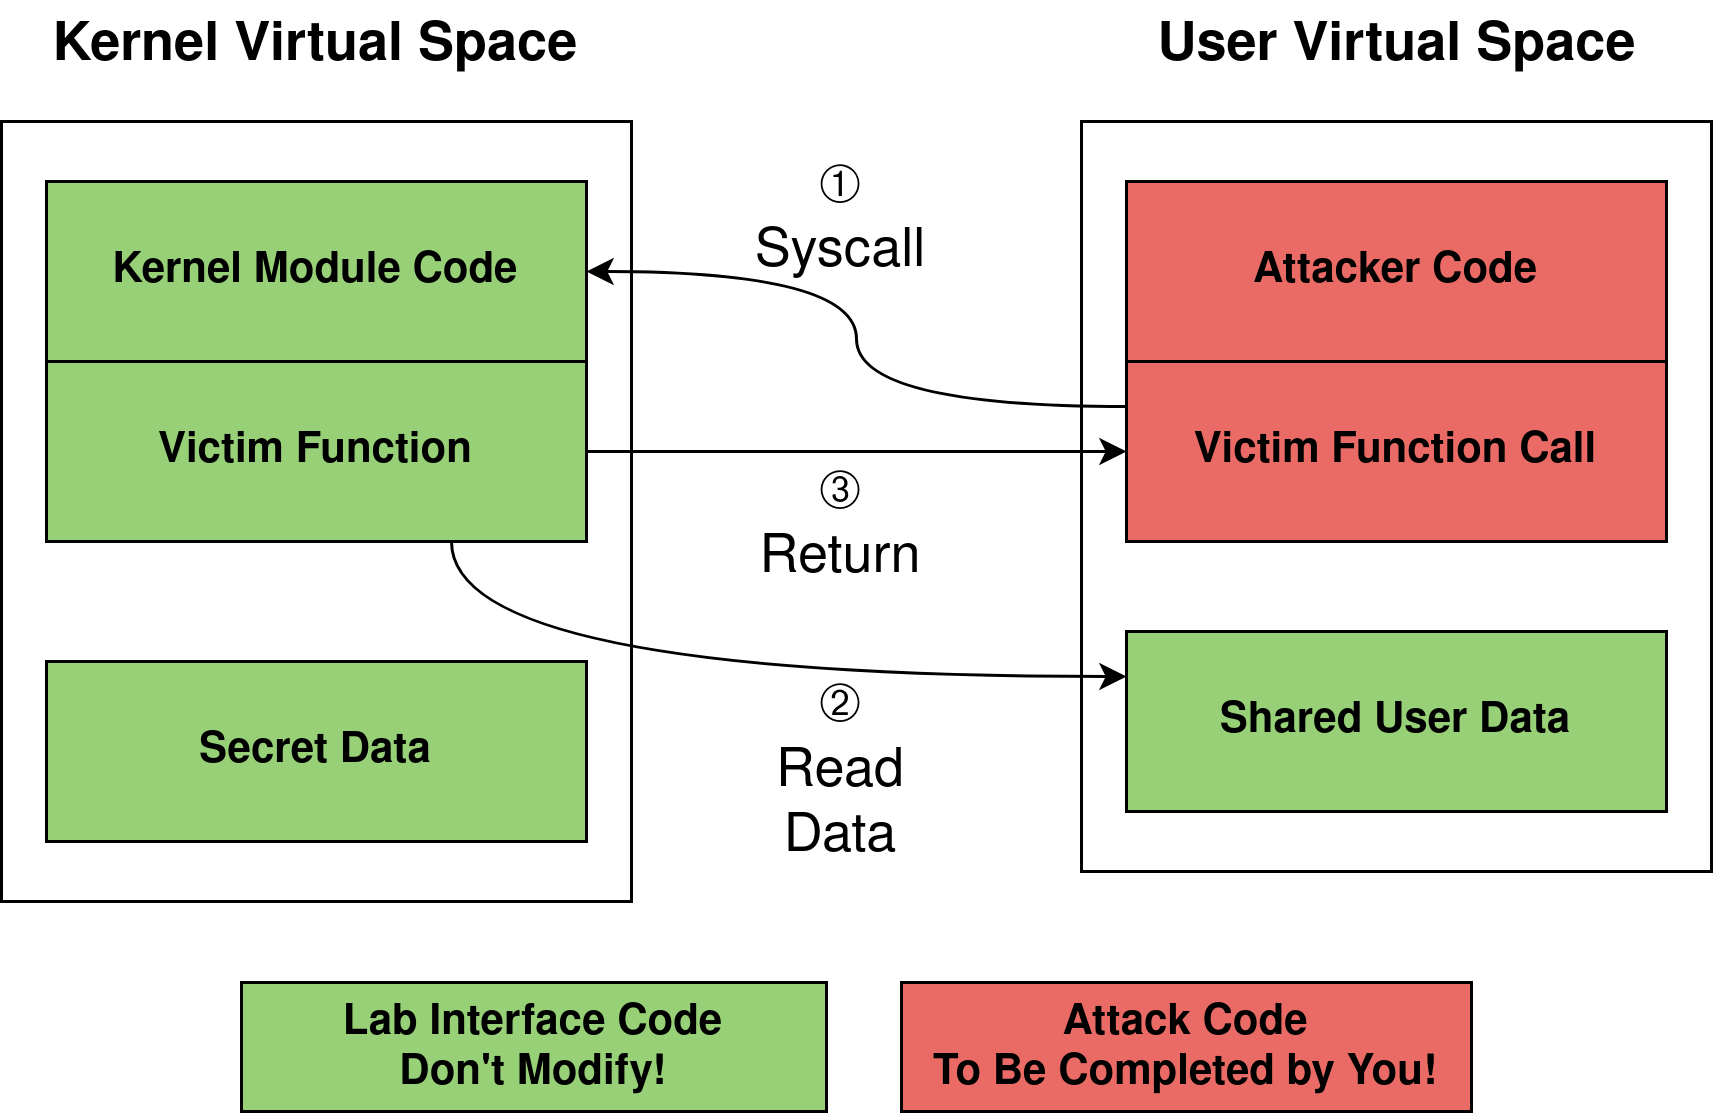
Figure 1 - Attack Setup
In this lab, we have created two data arrays, one called shared_mem residing in the userspace, and the other called partX_secret residing in the kernel space. The partX_secret array contains a secret string that you aim to leak. The custom kernel module is designed to take a user input (usually an integer), perform some simple computation on it, and then perform a read access on the shared_mem array. In this lab you will leverage cache side channels to monitor the kernel module’s accesses to the shared_mem array to leak the secret.
Inside the Kernel Module
For those who are curious, we provide description of how the kernel module is implemented. You do not need to understand its working mechanism to complete the lab. Reading the text below will give you a more thorough understanding of system software. The kernel module is defined in module-src/labkm.c. The communication between the userspace and the kernel module is handled using the procfs write handler.
On the lab machine, SMAP (supervisor mode access prevention) and SMEP (supervisor mode execution prevention) are both on, which means that the kernel cannot directly read or execute userspace memory. You may wonder, in this case, how the kernel can read the shared_mem array which is located in userspace. This is done by temporarily remapping an alias of the shared memory region into the kernel space. What we end up with is two different virtual addresses, one in the userspace and one the kernel space, both mapping to the same physical address.
The interaction between the kernel module and the userspace code involves context switches. When the userspace code calls the kernel module (via the write syscall), the processor transitions from the userspace to the kernel space, which will flush some microarchitecture structures, such as TLBs. The custom kernel module will then create an alias mapping for the shared memory region and execute the requested function. Before returning to the userspace, it will unmap the shared region. Therefore, every time the kernel module is called, the first accesses to each page will incur TLB misses. In Parts 1 and 2, we deliberately prevent TLB misses to make your attack easier by forcing page walks before performing any secret-dependent memory accesses. In Part 3, these redundant accesses are removed. You will need to craft an advanced Spectre attack that can succeed despite the added latency due to TLB misses.
The Secret
Each secret is a string of the form MIT{some_secret_value}. The string can be up to 64 bytes in length including the NULL terminator. You can consider the secret complete once you leak the NULL terminator.
Do not make any assumption about the secret other than it is a NULL terminated string of length up to 64 bytes (including the NULL terminator). The secrets will not change from run to run (they are constant for the lifetime of the kernel module). During grading, we may use different secret values to evaluate your implementation.
Code Skeleton
inc/lab.handsrc-common/lab_helper.cprovide a set of utility functions for you to use.src-common/main.cis used in all three parts. Themainfunction sets up a shared memory region (shared_memory) of sizeLAB_SHARED_MEMORY_SIZEbytes, and a file descriptor for communicating with the kernel module. The shared memory region is shared between the userspace and kernel.part1-src/attacker-part1.cis the file you will modify in Part 1 to implement your Flush+Reload attack. The methodcall_kernel_part1can be used for calling into the kernel module.part2-src/attacker-part2.cis the file you will modify in Part 2 to implement your Spectre attack. The methodcall_kernel_part2can be used to call into the kernel module.part3-src/attacker-part3.cis the file you will modify in Part 3 to implement your advanced Spectre attack. The methodcall_kernel_part3can be used to call into the kernel module.inc/labipc.hcontains bindings for the interface to the kernel module from userspace. You can ignore this, as our provided code handles the communication with the kernel.
Compile, Test, and Autograde
This lab will be autograded. After you hand in your code, we will embed different secret strings in the kernel and rerun your code to see whether it effectively leaks these strings. If your code works reliably with the autograder, you should expect no surprise with your grades. Instructions for compiling the code and running the autograder are below.
From the root directory, use make to compile the project. The binaries part[1-3] will be produced in the same directory (run them by calling ./part[1-3]. The results of your code will be printed to the console – on success you should see the secret leaked from kernel memory printed to the console.
An example of the expected output is below:
$ ./part1
MIT{part1_secret_value}
You can invoke the autograder with ./check.py X, where X is the part to check.
An example of the expected output is below:
$ ./check.py 1
Checking part 1 ...
You passed 950 of 1000 runs (95.0%)
Success! Good job
You can check all parts at once with make and then ./check.py all
Part 1: Leaking Kernel Memory via Flush+Reload (35%)
In this part you will set up a cache-based side channel to leak information from the kernel using Flush+Reload.
1-1 Exercise
To implement a Flush+Reload attack, you will need timing information to distinguish between cache access latency and DRAM latency. Run your Cache Attack Lab Part 1 latency measurement code to determine the L1, L2, and DRAM latencies and report your results (you will need these values later).
Attack Overview
The pseudocode for the kernel victim code of Part 1 is shown below.
def victim_part1(shared_mem, offset):
    secret_data = part1_secret[offset]
    load shared_mem[4096 * secret_data]
The victim function takes a pointer shared_mem (pointing to the starting of a shared memory region) and an integer offset as input. First, the code loads a secret byte from a secret array named part1_secret. The byte to leak is chosen by the attacker-controlled offset. When the offset is 0, the first secret byte will be loaded; when offset is 1, the second byte will be loaded, and so on. Next, the victim mutiplies the secret byte with 4096 and uses the result as an index into the shared memory array. For example, if the secret data was the character ‘A’ (0x41), then the 0x41’th page in the shared memory region will be loaded into the cache.
Recall that the secret is a string up to 64 characters long (including the NULL terminator). The attacker can leak the secret one byte at a time using Flush+Reload as follows:
- Flush the memory region from the cache using
clflush - Call the victim method using the desired offset to leak the secret byte
- Reload the memory region, measure the latency of accessing each address, and use the latency to derive the value of the secret. When the value is
0x00(i.e.NULL), the attack is complete.
1-2 Discussion Question
Given the attack plan above, how many addresses need to be flushed in the first step?
Allowed Code
You can define your own helper methods as you desire. You can use any method in inc/lab.h as well as the provided methods in attacker-part1.c.
You should only use the provided call_kernel_part1 method to interact with the kernel module. This function takes three arguments: a file descriptor to the kernel module, a pointer to the shared memory region, and the desired offset. kernel_fd and shared_memory can be directly passed to this method without modification. The offset to use for a given invocation is up to you.
1-3 Exercise
Implement the Flush+Reload attack in
part1-src/attacker-part1.cto leak the secret string. Build the project withmakeand run./check.py 1from the main directory to see if you passed Part 1.
Build your attack step-by-step: start by leaking one character first, then try to leak the whole string.
Submission and Grading
This part is graded on your changes to part1-src/attacker-part1.c and your answer to the exercises/discussion questions. Full credit will be awarded to solutions that report the correct secret more than 95% of the time, while partial credit will be awarded for solutions which perform worse than that. Each attempt should take no longer than 30 seconds.
Part 2: Basic Spectre (40%)
Now that Flush+Reload is working, let’s move on to actually implementing a Spectre attack! Below is the pseudocode for Part 2’s victim code:
part2_limit = 4
def victim_part2 (shared_mem, offset):
    secret_data = part2_secret[offset]
    mem_index = 4096 * secret_data

    # to delay the subsequent branch
    flush(part2_limit)

    if offset < part2_limit:
        load shared_mem[mem_index]
This victim is quite similar to Part 1, except it will only perform the load if the offset is within a specific range (e.g., offset<4).
2-1 Discussion Question
Copy your code in
run_attackerfromattacker-part1.ctoattacker-part2.c. Does your Flush+Reload attack from Part 1 still work? Why or why not?
Attack Outline
Below are the steps required to leak a single byte. You may need to alter your approach to account for system noise.
- Train the branch predictor to speculatively perform the load operation (i.e. take the branch).
- Flush the shared memory region from the cache using
clflush. - Call the victim function with an offset beyond the limit, leaking the secret byte during speculative execution.
- Reload the memory region, measure the latency of accessing each address, and use the latency to determine the value of the secret.
As you’ve observed in previous labs, side channel attacks generally do not work on the first attempt. Here’s some hints that may help you if you get stuck.
- Noise: It is common to observe noise when performing any sorts of side channel attacks. Calling the victim method just once may not produce the most accurate results. You may benefit from repeating the attack multiple times, using statistical methods to decode the secret with a higher precision.
- Branch Predictor: Modern processors employ branch predictors with significant complexity. Branch predictors can use global prediction histories, which allow different branches to interfere each other. Besides, the branch predictor is shared between userspace and kernel space. If the speculation is not working as expected, you may need to reduce the number of branches in your attack code.
- Mixing Measurements and Output: Due to the sensitivity of measurements, it is a bad idea to print latencies while measuring cache-based side channels. Instead, it is better to perform all measurements in one loop, store the results in an array, then print the results in a second loop. This prevents your reporting operations from negatively affecting the branch history/cache state.
2-2 Exercise
Implement the Spectre attack in
attacker-part2.cto leak the secret string. Build the project withmakeand run./check.py 2from the main directory to check whether your code passes.
2-3 Discussion Question
In our example, the attacker tries to leak the values in the array
secret_part2. In a real world attack, attackers can use Spectre to leak data located in an arbitrary address in the victim’s space. Explain how an attacker can achieve such leakage.
2-4 Discussion Question
Experiment with how often you train the branch predictor. What is the minimum number of times you need to train the branch (i.e.
if offset < part2_limit) to make the attack work?
Submission and Grading
This part is graded in the same way as Part 1. Full credit will be awarded to solutions that report the correct secret more than 95% of the time, while partial credit will be awarded for solutions which perform worse than that. Each attempt should take no longer than 30 seconds.
Part 3: Advanced Spectre (25%)
Now that we’ve got our Spectre attack working, let’s try a harder version of the same problem. Below is the pseudocode for Part 3:
part3_limit = 4
def victim_part3 (shared_mem, offset):
    if offset < part3_limit:
        false_dependency = lengthy computation # the computation result is 0
        secret_data = part3_secret[offset]
        mem_index = 4096 * secret_data
        load shared_mem[mem_index + false_dependency]
There are two key differences in the victim code compared to Part 2. First, the victim no longer flushes the limit variable (partX_limit) before the branch. Second, we have added a false dependency before the memory access, making the memory access start later in the speculation window.
If you copy run_attacker from Part 2, you should see that your attack does not work with the new victim. This is because in the modified victim code, the memory access instruction we try to monitor may not be issued speculatively for three reasons:
- The speculation window becomes shorter. The speculation window starts at the cycle the branch (
if offset < part3_limit) enters the processor, and ends at the cycle when the branch condition is resolved. If thepart3_limitvariable is cached, it will take a very short time to obtain its value and resolve the branch condition. As a result, the speculative window becomes shorter. - The issue time of the secret-dependent memory access is delayed. Due to the data dependency between the
false_dependencyline and theload shared_memline, the secret-dependent memory access can only be issued after the variablefalse_dependencyis computed. It is possible that the branch condition is resolved before the speculative load even executes. - The access to the shared region triggers a TLB miss. As perviously discussed, due to the design details of the custom kernel, the address mapping for the shared region will not be resident in the TLB upon entering the kernel. Different from Part 1 and Part 2, here we do not force page walks before running the vulnerable code. As a result, the memory load must first perform a page table walk, increasing the time it takes to perform the load (thereby increasing the chance that the speculative window closes before your address makes it to the cache).
To make your attack work, you will need to find a way to increase the speculation window such that the speculative load has a higher chance of occuring. Note that you cannot change the long latency memory address dependency, nor can you change the fact that a TLB miss occurs when performing the load.
Note
If your implementation from Part 2 can pass the test for Part 3, congratulations and please reach out to us! We have designed this part to make basic spectre attack implementations work ineffectively, and we’d be curious to learn how you made it work in one shot.
We have provided a helper method called call_kernel_part3 that you can use to interact with the kernel module just like Parts 1 and 2.
3-1 Exercise
Optimize the attack in
attacker-part3.cto leak the secret string. Build the project withmakeand run./check.py 3from the main directory to see if you have passed.
3-2 Discussion Question
Describe the strategy you employed to extend the speculation window of the target branch in the victim.
3-3 Discussion Question
Assume you are an attacker looking to exploit a new machine that has the same kernel module installed as the one we attacked in this part. What information would you need to know about this new machine to port your attack? Could it be possible to determine this infomration experimentally? Briefly describe in 5 sentences or less.
Submission and Grading
Full credit will be awarded to solutions that report the correct secret more than 20% of the time, while partial credit will be awarded for solutions which perform worse than that. Each attempt should take no longer than 10 minutes. We will give partial credit if the attack can recover most of the chraracters.
You can check all parts at once with make and then ./check.py all
Acknowledgements
Contributors: Joseph Ravichandran, Mengjia Yan, Peter Deutsch.